Friday, January 30, 2009

The Goodies Have All Arrived!

I’m a little late in writing this since most of the hardware arrived last Friday, January 23rd, but better now than never…
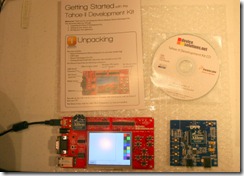
IMG_8988From Microsoft, I received my development kit for the Dare to Dream Different Challenge.  Included in the kit was the Device Solutions Tahoe-II board with an XBee chip, a USB XBee development board, a one page “Getting Started” pamphlet and a disk with the Tahoe-II SDK on it.  I wasn’t expecting the USB XBee development board and it was a nice surprise since I had already decided on XBee as my communications technology.  I already have an idea on how to utilize this board.

So far, I’ve run several sample programs through the Tahoe-II and am very impressed with how responsive it is and how easy Visual Studio 2008 makes it to develop for this board.  The real challenge it seems at this point is going to be figuring out how to communicate using XBee.  Although the board has support for XBee, I’ve found that the .net Micro Framework 3.0 does not yet have this support.  Fortunately, Michael Schwartz has an open source project on CodePlex that appears to make working with XBee somewhat trivial.  I do wish there was more documentation and sample code available.
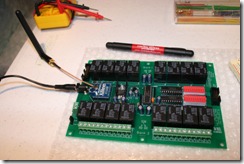
IMG_9001 Since I am also going to need a relay board, I decided on the ZUXPSR1610ProXR 16-channel 10 amp Zigbee (XBee) relay board by National Control Devices.  Since I haven’t figured out exactly what my relay requirements are going to be yet, I went ahead with this one.  It’ll probably have more relays than I need and will certainly handle more current, but I thought that might come in handy after the competition when I decide to use it for other projects.  There is no documentation that came with this board.  However, I presume that switching the relays will basically be the same was communication with the GPIO ports on the Tahoe-II.  I ordered the board with an external antenna since my plan is to eventually house this board in a project box. 

The board operates on a 12V DC power supply which happens to be a big bonus for me since I designed the circuitry for the LEDs on the mock yard to be powered by 12V DC.  The board has a set of terminals where I can run the 12V power off of it.  This is great since it means that I will not have to use two power supplies (one for the board and one for the mock yard).  Something isn’t quite the same as that of the power supply I had been using to build the mock yard with and I’ve discovered that my green LEDs do not shine very brightly when powered from the board.  I’ll have to go back and replace the resistors on the green zone circuit to some with lower resistance.  I’ll do this later on after I have the software working.  As long as the circuit is working well enough for me to tell that the relays are working, I’ll be fine with it for now.
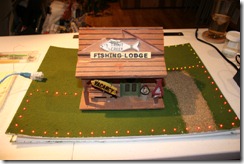
IMG_9008 Speaking of the mock yard…  I put the finishing touches on it earlier this week.  I used some model train supplies I picked up at Hobby Lobby to decorate the foam board with “grass” and a gravel driveway.  Unfortunately, the application of watered down glue used to adhere the “grass” also has caused my foam board to bow up.  This is very frustrating.  I’m thinking that if I spray some water to the bottom side of the board that it may equalize out the shrinkage and cause it to straighten out.  I will also be replacing the bottom piece of foam board with a piece of 1/4” acrylic Plexiglas.  This will allow the circuitry to be easily viewed.  I’ll probably also screw down the sides of the foam board to the Plexiglas to force it to lay flat.  Again, these are all projects that will have to wait until later when everything is functional.  Like the old bird house I found in the garage? :) 

Also, notice that I ran all of the lead wires for the LED circuits to an RJ45 plug mounted on the side of the foam board.  This will make it much easier to separate the parts for transportation when I have to go to Redmond to demonstrate the project for Round 3 ;)  Since I only need three pairs of wires for my three zones and the RJ45 port allows for four pairs, I went ahead and ran a pair of wires under the house that I can use to do some yet undetermined very cool thing with on the house.  Any ideas?

Well, now the real fun has begun.  The task of learning the .net micro Framework and XBee.  Since I don’t really plan to disclose all the details of my development from here out until after the competition is over, I’m not really sure how often updates will continue to be posted here on the blog.  I’m sure there will be some screen shots.  So, stay tuned.

Tuesday, January 20, 2009

Yellow Zone is alive!

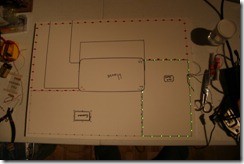
IMG_8939Well, I think you get what’s going on here by now.  So, this is the last of the LEDs that have to be wired for the mock yard.  One thing you may notice different about this zone is the little zone within it.  This is going to be a garden area.  In case you don’t know about invisible dog fences, it is possible to create zones like this to keep dogs out of your garden, porch, etc.  This little zone will always be activated when the yellow zone is activated.  The Tahoe-II still hasn’t arrived...  Tomorrow, I’ll start decorating the mock yard and try to make it look like a little more than a piece of foam board with lights.  Must now get some sleep…

Friday, January 16, 2009

The Green Zone is Alive

The electronic parts I ordered for the IMG_8846model yard arrived early, so it was time to start soldering again.  Tonight I got all of the green LEDs in place and wired up.  This is a much more tedious task than you would think from looking at the end results.  I also finished up the last section of the red zone.

I’m taking a little time off and heading to Savage Gulf for three days of backpacking with Jr. this weekend.  So, I guess it’ll be Monday night before I can finish up the yellow zone.  If we don’t freeze to death (my thermometer says its 8.8° F right now…) then there should be a trip report here after I get back.

With any luck maybe the Tahoe-II will arrive early next week.

Thursday, January 15, 2009

Red Zone is complete…almost.

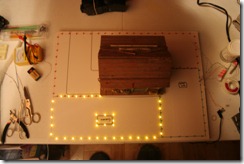
For the Dare to Dream Different Challenge, I have decided to begin by building a mock yard that will have three different “zones” that will be controlled by the Tahoe-II board and my .net Micro Framework software.  There will be three zones in this yard: red, green, and yellow.  Each zone will be a series of LEDs that will light when that zone is activated by the software.  Since I already had a supply of red LEDs, I decided to start there while I wait on all the other parts to arrive.

Red Zone is Alive!
The Red Zone is alive!

You may note that the red zone isn’t completely alive…  I was one LED short, so the last section isn’t lit yet.  This will be remedied as soon as the rest of the parts arrive.

IMG_8809

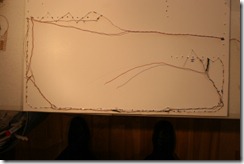
The yard is constructed of a piece of foam board that has been cut so that it folds in half.  The circuitry is sandwiched between the two pieces for its protection.  Each zone will be a separate circuit and they will all terminate at an RJ45 jack for easy connection to the relay board and Tahoe-II.  Everything is powered by a single 12V power supply recycled from an old Linksys router.

Next, I’ll finish up the other two circuits and maybe add a little decoration to polish it off.  Hopefully, I can get all this done before the Tahoe-II arrives and I’ll be able to then focus entirely on the real work at that point.


Tuesday, January 13, 2009

I’m a Dare to Dream Different Challenge Semi-Finalist!

D2DDLogo

At Microsoft PDC08 this past November I stopped and talked to the guys in the .net Micro Framework booth (like you do with every other booth at those conferences).  Since I’ve never really worked at a company that built devices that would need this type of technology, this was just one of those “yea that’s neat but I’ll never use it” bits of info.  The one thing I did carry away from our conversation was that they were hosting a contest and were giving away some really neat pieces of hardware to the semi-finalist and even bigger prizes to the finalist.  So, I took one of their flyers and a week or so later I sent in an idea…

The rules for entry were simple.  Come up with an idea of how you would use the .net Micro Framework to make a useful invention and write it up in 250 words or less.  Not much work there.  I had an idea and spent about 20 minutes submitting my entry.  Then I basically forgot about the contest thinking that my idea was probably not sophisticated enough to have a chance.

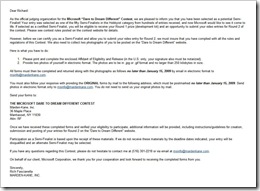
I was wrong.  On January 8th, I received this email...

Semi-finalist notice email(click to enlarge)

and my name on the contest website

Semi-finalists List(look for the hick from Shelbyville ;) 

So, what was my idea?  Well, at the time this was all happening I was in the process of installing an invisible dog fence at our house.  I was running the wire so that I could section off different parts of the yard where I might want the dog to run.  He could be isolated to just the area where his dog house was at if we were having a party outside.  He could be allowed to roam the whole backyard, but not the driveway in case visitors were coming and didn’t want to be greeted at their car door by Zeus (yes, he’s as mighty as his name).  Or he could just be allowed to roam the whole yard.  You get the picture. 

To make all this work was either going to require a bunch of manual re-wiring every time I wanted to change the zones where he could run or I was going to have to configure an array of switches which would still take considerable knowledge of the system in order to operate.

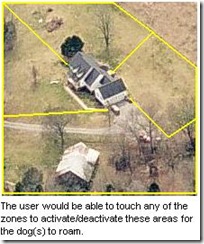
My idea was to create a touch screen interface that would allow a user to simply touch an aerial photo of their yard to configure which zones the dog would be allowed to roam.  Here’s my actual submission…

I would build a touch control system for invisible dog fences. It would show an aerial photo of the owner's property and allow them to touch areas of the yard where the fence should be activated/deactivated. This could possibly be combined with outdoor cameras to allow the owner to control the device over the internet based on where the dogs are currently located.

Invisible fence systems are becoming very popular. However, most are setup as an all or nothing solution. To isolate particular parts of the yard currently requires manual re-wiring or complicated switching systems. This would be a very intuitive tool for controlling these systems.

I'm a professional Windows developer and electronics hobbyist. I am also an invisible dog fence user. I've been planning to build a control system similar to the one described using LEDs and switches, but after meeting with Microsoft at PDC2008 and discussing the possibilities of the .NET micro framework, I'm now excited about the possibilities of this approach. However, I'm unable to justify the cost of the hardware on my own. I had three years of electrical engineering in college before deciding to major in computer science. I can make this work.

and the attached aerial photo of my yard that resembles what the touch screen would look like…

dotnetMicroChallenge

So, now that I’m one of the 50 semi-finalist now what?  Well, my prize for making it this far is that Microsoft will be sending me a Tahoe-II development board and software that I can use to build a working prototype.  The end product of this stage will be a video that I must produce that will demonstrate what I have developed. 

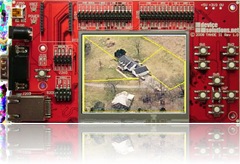
TahoeII-DemoThe Device Solutions Tahoe-II Board 

If my video is selected as one of the five finalist then its off to Microsoft I go to give a live demonstration.  There really hasn’t been any word yet about what the prize is other than there are “$101,000 in prizes and numerous other benefits up for grabs”.  Of course, this contest is more about the geekdom fame than it is about the prizes.  It would look really nice on a resume’.  Who knows, maybe one of the invisible fence manufacturers will take an interest.

While I’m waiting for the board and development kit to arrive, I’ll be working on my model yard (complete with a working LED fence.  You can’t see an invisible fence on the video…) and studying up on the .net Micro Framework.  More to come on that as I progress in the days to come.  I only have until March 31st, 2009 to turn in my video so there’s going to be a lot of late nights in the next few weeks…

Monday, January 14, 2008

Windows Home Server

WHS This week I've been at home taking care of my wife after she had a C-section delivery of our new daughter.  In my free time (when she and the kids are sleeping), I've had some time to work on building a Windows Home Server machine.

I had an old Dell Dimension 2100 laying around that a friend gave me when he upgraded that I decided would be sufficient to at least test an install.  Microsoft recommends you use a machine that has at least a P3 1Ghz processor with 512MB of RAM.  My test machine has a 1.1Ghz P4 processor with 512Ghz of RAM so in theory it should work.

Since the computer only had a 40GB hard drive, I decided that I'd go ahead and invest in a 500GB SATA hard drive since I anticipated needing lots of hard drive space.  This is where my first problem was encountered.  The old Dell doesn't have SATA ports, so I invested about $15 in a VIA VT6421A 3-port SATA RAID controller since I've made a personal vow not to invest in any other IDE hard drives.
Then I ran into my next problem.  The installation disks for WHS come on DVDs and the old Dell only had a CD-ROM drive.  So, I temporarily pulled a DVD-ROM drive out of one of my other machines and popped it in the test machine and started the installation.

The install went smooth.  I told it to install to the new drive and it went through its motions for 30 minutes or so while I went and had lunch.  Then I came back and the install wanted me to reboot to continue.  I did and then found my next problem.  The old machine would not boot off the drive on the add-on SATA controller.  This was a real bummer since I really didn't want to have to use any IDE drives, but not a big issue.  My main machine had an extra 250GB drive in it that I wasn't using for anything yet, so I pulled it out and plugged it into the on-board IDE controller and re-installed WHS.  I then added the 500GB drive and expanded the total capacity of the server to about 700GB (who knows where that extra 50GB went...).
I rebooted and the install finished successfully.  It's alive!  So, then I spent a few minutes exploring the WHS Console which is the only obvious difference between WHS and Windows Server 2003.

Then I installed the Connector software on three machines (a Windows MCE 2005 machine, a Windows Vista Ultimate machine, and a Windows XP Pro laptop).  The install sends you through a wizard that lets you configure backups for the machine you are adding to WHS.  On the MCE 2005 machine, I ran into a problem.  When WHS was examining the machine looking for drives to backup, it came back and reported:
“This computer cannot be backed up automatically because it does not have any hard-drive volumes that are configured with the NTFS file system”.
After spending a few hours researching the problem, I finally found a solution that fixed the problem.  It turns out that some third-party software can modify a registry key that WHS uses and the solution is to set this key back to the value that Windows originally sets it to.  The key is:
HKEY_LOCAL_MACHINE\SYSTEM\CurrentControlSet\Control\Class\{4D36E967-E325-11CE-BFC1-08002BE10318}\UpperFilters

I set the value to "PartMgr" and rebooted and then the backups were configured without problems.
The initial backups ran fine that night and I was quite impressed by their efficiency.  One machine that had 233GB of used hard drive space backed up to 83GB on the WHS server.

One of the really exciting features of WHS is that it allows you to remotely access all of the computers in your home network from anywhere in the world.  No static IPs are required for any of the machines.  From the WHS console, you setup a name for your network and it gives you an address such as https://thelees.homeserver.com which takes care of monitoring your modems public IP address and sets up a public web site where you can configure WHS and access your shared files.  All of this is controlled through user accounts.

This is where I ran into my next problem.  I use a Linksys firewall router to block all incoming traffic from reaching my computers.  After some research, I learned that I needed to setup port forwarding in my router to my WHS server for ports 80, 443, 3389, and 4125.  The last two are specifically needed for Remote Access while the first two are used to connect to the WHS web site.

Now that I have all the basics working, I'm going to "play" with it for a few weeks and check out some add-ins that are available.  I'll write more on individual features as necessary.  Also, I'm going to start researching some better cases that are more suited to lots of hard drive expansion and a motherboard that supports booting from SATA.

So far, the hardware seems to be plenty powerful to make WHS run like a champ.

Friday, January 4, 2008

Special Delivery

Last night as we were getting things ready to head to the hospital in the morning for the delivery of Elizabeth, I decided that I had to find a better way to let everyone know the details of our special delivery. 

For the delivery of the first two boys we did things the "old fashioned" way and just called people.  This is very time consuming and not really what I wanted to be spending my day doing.  Taking care of my girls being the activity of choice.  This is a relatively inefficient means of getting the job done, plus I wanted to be able to send real-time photos out to our family and friends.

SpecialDeliverySo, I thought about this a little and decided that ultimately the easiest way to get this done had to involve using a camera phone to send TXT & PIX messages.  But, I couldn't just add a bunch of recipients to the message every time I wanted to update people because the camera phone I planned to use would only let me add four recipients and I wanted to get the message out to almost 200 email addresses.

My first proposed solution was to just setup a distribution list (group) called "Baby List" in Gmail with all the intended recipients.   Then I would setup a forwarding rule that would forward any messages that arrived that were sent from the camera phone to my Baby List group.  This is where I ran into the first snag.  It turns out that Gmail will not let you setup a forwarding rule that forwards to a group.  In fact, it will not let you forward to more than one person for a single rule.  I could have setup 200 different rules, but that would have taken longer than just making the calls...

Then I had another idea...  I could use Microsoft Outlook to check my Gmail account using POP3 and setup the rule there.  Outlook will not let you forward to a distribution list, but it will let you attach an almost infinite list of email addresses to the rule as long as they are separated by a semicolon.  So, after doing some data massaging to get a semicolon delimited list of the addresses I had stored in Gmail into my Outlook rule, it was time for a test.

For the first test, I set the rule to just forward back to my Gmail email address.  This way if something didn't work, 200 people didn't know about it ;)  I took a picture with the camera phone and sent it via a PIX message to my Gmail address.  MS Outlook, which was running on my home computer, then picked up the message from Gmail and processed the rule which automatically forwarded it back to my Gmail address.  Success!

Then it was time for the real test...  I put the 200 or so email addresses onto the rule and repeated the test.  I had been concerned about having so many email addresses in one message and it turned out that my concerns were warranted.  The first 50 or so people received the message without any problems and then I got a message back stating that there were "too many recipients". 

Well, the solution to this was easy.  I split the mailing list up into three equal size lists and created three identical forwarding rules but with different distribution lists for each rule.  Problem solved.  Time to get some sleep before the big day.

This solution worked like a charm.  I was able to snap photos of Elizabeth during delivery and instantly forward them out to all my friends and family without ever dialing a single phone number (assuming they were checking their email).

Had I decided to start on a solution to this problem farther in advance, I probably would have written a more robust solution using my PocketPC phone.  But, given the short time constraint that I had to solve this problem I think it worked out pretty good.  If you ever need to solve a similar situation where you need to keep a long list of people notified of an activity in near real-time, give it a try.